Minikube and Let’s Encrypt
HTTPS Kubernetes for Everyone
The other day I wanted to get HTTPS working with my local Minikube… and could not find a comprehensive example showing how to do it reliably. After quite a bit of research, here are the results.
TL;DR
This article focuses on three things:
- Connect Minikube running on a local Linux PC to the open Internet.
- Generate a Let’s Encrypt certificate to support HTTPS.
- Backup and restore the client certificate.
The main steps to accomplish the three items above are explained in the article, with not too much depth — let’s just get HTTPS working first :-)
Update May 7, 2021: There is a follow-up article available here showing how to add OAuth2 authentication to this Kubernetes application.
Update June 16, 2021: There is a follow-up article available here showing how to create a backup of a renewed Let’s Encrypt certificate.
Is this safe to do?
You are going to expose your minikube cluster to the public Internet, which could be inherently unsafe. To get the certificate, you will need to map ports 80 and 443 to your local minikube cluster, so that Let’s Encrypt can authenticate your domain because we are using an HTTP-based authentication method. So you should be mindful of what your services and APIs allow outside users to do.
What you need to bring
- A domain name that you control and that can map to your network gateway — in my case, No-IP.com does the trick, providing me with a domain name that dynamically points to my home router’s public IP number. No-IP has a free option that is sufficient for this exercise; other dynamic DNS services should work as well.
- A Linux PC — I am using Ubuntu 20.04.
- Minikube version 1.19 or better. Note that the networking portion of this tutorial relies on VirtualBox 6.1 as the VM driver. Kubectl is needed, and Docker 20.10 if you want to use docker as runtime.
- Configuration files from Github: https://github.com/klaushofrichter/Minikube-and-LetsEncrypt — you can download a zip or clone the repository.
The point of the tutorial is that you can reach Minikube’s Kubernetes application via HTTPS from anywhere. The Kubernetes application running on Minikube does not matter much in this context — it is in this example just a simple deployment of two Echo apps. You can easily find a lot of tutorials about Kubernetes applications, and I am assuming that the basics of everything Kubernetes are known. Installation of Minikube, virtualbox, Docker, No-IP, or other pre-requisites are not covered here. You need to be comfortable with git and github to see the YAML configuration files.
The YAML files actually contain some of the “magic” that may not be obvious at first. There are some essential annotations needed to make the process possible or more reliable — but we don’t discuss these in this article, there is good documentation already. The interesting thing here is the usage pattern; for details, check the docs.
For the practical exercise, you need the YAML files. You can clone the repository with git clone or get the files through ZIP or other means.
git clone git@github.com:klaushofrichter/Minikube-and-LetsEncrypt.gitcd Minikube-and-LetsEncrypt
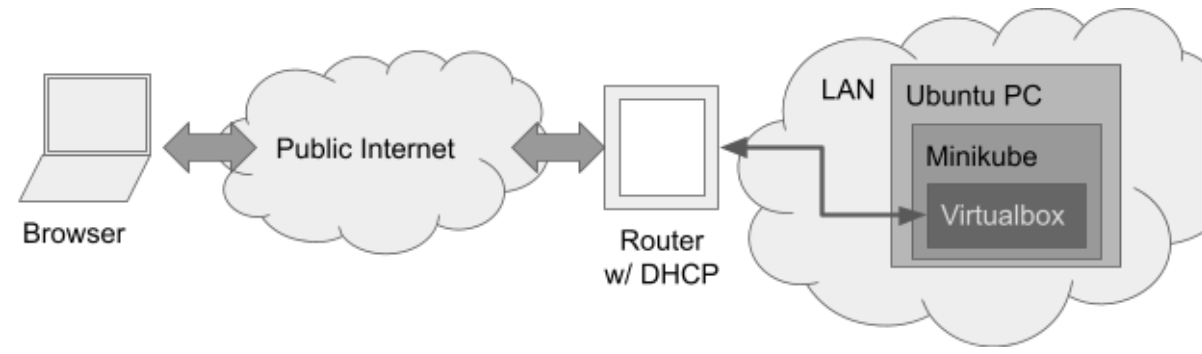
Launching Minikube and getting that LAN IP address
Assuming you have Minikube and virtualbox installed… open a terminal and call this:
export KUBECONFIG=kubectl.configminikube -p my-cluster --driver=virtualbox start
This will take a little while. We are creating a cluster named my-cluster using a virtualbox VM.
Minikube has an IP address (call minikube -p my-cluster ip), but it only routes locally on your machine… connecting to the public Internet without using a proxy was a headscratcher for a while. Luckily, there is a great article about this right here (thanks, Danny). It installs a virtual network card on the VM that gets its own local IP address. Read the article for the details, here are the steps:
MAC="2221d707e6c1" # https://miniwebtool.com/mac-address-generator/VBoxManage controlvm my-cluster poweroffnic=$( VBoxManage showvminfo my-cluster --machinereadable | grep ^nic | grep ‘"none"’ | head -n1 | cut -d= -f1 | cut -c4- )interface=$(ip route | grep default | awk '{ print $5 }')opts="--macaddress${nic} ${MAC}"VBoxManage modifyvm my-cluster --nic${nic} bridged --bridgeadapter${nic} ${interface} ${opts}minikube -p my-cluster startVBIP=$(minikube ssh -p my-cluster -- ip addr show eth2 | grep inet | awk '{ print $2 }' | cut -d/ -f1)echo "virtualbox ip is ${VBIP}"
If things go well, the ${VBIP} LAN IP address is the virtual box bridged network card IP visible to your local network, and not only visible to your local machine. So, this address can be routed to by your local router.
It is now needed to enable the minikube ingress add-on.
minikube -p my-cluster addons enable ingressThis is a nice built-in minikube addon to help manage to route using nginx.
Before moving on, it is needed to disable a verification step involving webhooks — there is some discussion about this here and elsewhere. As of this writing, version 0.44 of the Nginx Ingress is used by minikube. The issue when using this with cert-manager later appears to be a versioning conflict of the ingress with cert-manager. It may be fixed in the future, but for now, let’s just circumvent the issue:
kubectl delete validatingwebhookconfigurations ingress-nginx-admissionMinikube is now ready.
Deploy a Kubernetes Application
In this example, we deploy a simple “echo” application. You can create your own containers if you are not comfortable downloading from somewhere, but Hashicorp’s Echo containers are used widely.
We are now using YAML files that you can get from the repository mentioned above. For convenience, it’s assumed that you cloned the repository to your local machine.
export NAMESPACE="my-app"kubectl create namespace ${NAMESPACE}cat hello.yaml.template | envsubst | kubectl create --save-config -f -cat welcome.yaml.template | envsubst | kubectl create --save-config -f -
Checkout the YAML template source: The NAMESPACE environment variable used in the templates is substituted using the convenient shell command envsubst before passing the YAML to kubectl.
After a minute or so you can verify that the app is running by checking that two “hello” and two “welcome” pods are up and running.
kubectl get pods -n ${NAMESPACE}Expose the VM to the public Internet
Now you need to map your Domain Name to your router's IP using your domain name providers tools. Some routers have DDNS support built-in, this is quite convenient. There may also be a Linux executable for that, e.g. No-IP.com offers that.
Once this is done, you need to route ports 80 and 443 from your router to the IP address of the virtual network card that was shown before using your router's configuration tool. Note that this is NOT the IP address of your Linux PC.
The routing target for the external ports 80 and 443 are the same ports with the LAN IP number of the virtual network card that we installed earlier. From here, it is game on: your Kubernetes application is exposed to the open Internet.
You can now install an ingress that routes traffic from the public internet to your domain and to your Kubernetes application. You know the domain that you want to have certified later, so you need to replace your.domain.com with your domain name:
export PUBLICURL="your.domain.com"cat insecure-ingress.yaml.template | envsubst | kubectl create --save-config -f -
It may take a few seconds to settle. You can verify the ingress installation:
kubectl describe ing my-ingress -n ${NAMESPACE}This should show your hostname and the two services. You can ignore the alarming error: endpoints “default-http-backend" not found, if that shows. This just indicates that there is no default http backend, which is ok at this stage. You can now call curl on the services. The hello service should return “Hello”:
curl ${PUBLICURL}/helloInstall Cert Manager
Cert Manager is a toolset that manages certificates and supports Let’s Encrypt. Installing Cert Manager can be done by using a remote YAML file — with all the dangers. You can download it separately and review it if this is needed for confidence. Otherwise, call this:
kubectl create -f https://github.com/jetstack/cert-manager/releases/download/v1.3.1/cert-manager.yaml --save-configThis launches a few pods and configurations in an extra namespace cert-manager. It may take a few minutes… you should see three pods running with this command:
kubectl get pods -n cert-managerNow we need to set up a clusterissuer which determines how to get the certificate. In this case, we are using the Let’s Encrypt staging server. The YAML file is available in the Github repository:
export EMAIL="your.name@emailprovider.com"cat stage-clusterissuer.yaml.template | envsubst | kubectl create -f -
You will need to provide your email address in the call above: Let’s Encrypt wants to see this for the certificate process later. The above installs a clusterissuer that will use the Let’s Encrypt staging environment, which you should use first to get things going. This will result in an untrusted certificate, but it avoids running against usage limitations of the Let’s Encrypt production environment.
Configure Ingress for Let’s Encrypt Staging
Now we initiate the actual certification. We are using the domain that you previously defined in PUBLICURL.
export CERTLEVEL=”stage”cat secure-ingress.yaml.template | envsubst | kubectl apply -f -
Now we need to wait for a few things, including the Cluster Issuer dealing with the Let’s Encrypt’s challenge. Also, port 443 will be enabled for your applications, and the certificate will be installed.
This can take a while, but probably not more than five minutes. This step may sometimes fail. Check out the Troubleshooting paragraph at the end of the article for some analysis ideas and possible fixes.
If things worked well, you should be able to see the Ready state turned to True for the certificate:
kubectl get certificate -n my-appTest the HTTPS setup
To see if it is working, just do a curl call to the application:
curl -k -L ${PUBLICURL}/helloIf things are good, the word “Hello” is returned. We use -L to allow curl to follow the redirect from HTTP to HTTPS. Because the Let’s Encrypt staging certificate is actually untrusted by design, we use -k to ignore the certificate validity check at this point. But we show that routing to your domain works and the Kubernetes app responds. If you call the above without -L you should see a redirect error and without -k you should get a certificate error.
Use the Root Cert to authenticate local curl calls
To get rid of the -k it is needed to locally install a root certificate to verify the client certificate and tell curl to trust this root cert. Use these calls to download the (not trusted) root certificate that is used to authenticate the client certificate:
curl -s http://stg-x1.i.lencr.org | openssl x509 -inform der -out caroot.pemopenssl x509 -noout -in caroot.pem -subject -dates
You should see the validity dates of the root certificate. Now you can call curl without the -k option, using HTTP with redirect, or HTTPS directly, but you need to point to the root certificate:
curl -L --cacert caroot.pem http://${PUBLICURL}/hellocurl --cacert caroot.pem https://${PUBLICURL}/welcome
Congratulations… you got your Kubernetes application accessible from the public internet secured with HTTPS (if you trust the untrusted root certificate).
Your browser will not recognize the Let’s Encrypt staging cert and show security warnings. It is possible to install the untrusted root certificate in a browser to avoid that, but this is dangerous: you are trusting an untrusted root certificate. It’s probably advised — if at all — to install the untrusted root cert for a test only, and immediately uninstall. Or use a specific browser that is used for this untrusted browsing only.
Backup the certificate
The certificate will disappear when minikube shuts down. Make a copy of the local cert like this:
kubectl get -n ${NAMESPACE} -o yaml secret ${NAMESPACE}-tls > ${CERTLEVEL}-${PUBLICURL}-cert.yamlReinstall everything with the existing certificate
Make sure that you actually have data in the certificate backup file that was just generated. Reinstallation of this certificate after minikube was shut down requires you to do all the steps above, but BEFORE the custerissuer is installed, deploy the certificate. This will cause the cluster issuer to use the available certificate and no challenge from Let’s Encrypt is performed anymore until the certificate needs to be renewed. You can see the dates in the certificate YAML file.
To start fresh, delete the minikube cluster:
minikube -p my-cluster deleteAnd then do all the steps from above, but before installing the clusterissuer deploy the certificate:
kubectl apply -f ${CERTLEVEL}-${PUBLICURL}-cert.yamlToo much typing…? Check out the info below about the start.sh script.
Where to go from here?
If things worked for you, you may want to create a production certificate. You would use the prod clusterissuer instead of the staging clusterissuer, i.e. use the YAML called prod-clusterissuer.yaml.template instead of stage-clusterissuer.yaml.template, and use prod as a value for CERTLEVEL. You should definitely save the prod client certificate at a safe place, as Let’s Encrypt has rate limits on production certificates, and you can not generate this on-demand as often as you may like.
Once you have a production certificate, you do not need to deal with caroot.pem anymore, and all your browsers should work directly. The cert-manager should take care of automatic renewal of certificates if you have the minikube setup running — although I did not test this yet. The renewed client certificate needs to be saved again when the time comes. (Update: the time came… and there is another article here covering this backup handling)
start.sh
Since it is tedious to type so much… There is a bash script called start.sh that does all the things above along with the article plus a little more, with all configuration files in the github repository.
Before you run a shell script on your machine, you should examine it so that you understand what it does — it’s all in the open. You need to change the environment variables in the first few lines to meet your needs. You should also configure your router before you launch the script: your router should allow you to associate a fixed IP address to the MAC address that you specify in the script. Virtualbox will use the MAC address for the virtual network adapter, hence you can predict the resulting LAN IP address.
The script adds a few generous sleep calls in the sequence to give processing time to handle the HTTP challenge or launch pods. It is possible to wait less, or do some intelligent thing here, using kubectl wait or similar calls, and monitor certain conditions that indicate when it is time to move on… but for simplicity, the sleep call will do in most cases, asking just for some patience.
The script applies the backup certificate if it is available. So with the first call to the script, it would generate the cert, and with the second call, the stored certificate is applied and restored — no Let’s Encrypt challenge is needed, cert-manager figures that out for you.
Thanks
Thanks to the community… There is a lot of information out there, and this article was made possible by reading the material that others provided. I hope to give back something here.
Troubleshooting
It does not always work… running the start.sh script offers me a 80% chance of success when dealing with the Let’s Encrypt challenge. That’s not great, but once the certificate is available, 100% restore success was observed.
Before it comes to the Let’s Encrypt challenge, there is a lot of configuration to be done. Issues may come up with missed steps or a configuration typo that’s hard to see. One hot spot to look at is the local routing: getting DHCP to hit the virtual network card is not hard, but easy to get wrong.
Here are some things to try when no certificate comes out for you:
- Check your DNS setup. Route port 80 to your local PC and build a little application server on your local machine port 80 and see if you can reach your local host from the outside (tip: turn off wifi on your phone and type the full URL on the phone). If it does not resolve, is there a DNS configuration issue?
- If DNS works, you need to take note of the MAC address for the new virtual network card that is installed in virtualbox. The MAC address can be defined by yourself, and it is recommended to set up your router’s DHCP server to assign the same LAN IP every time — Some routers do that automatically, but better safe than sorry. Once you know the virtualbox IP address, adjust your router that the WAN ports 80 and 443 are mapping to that LAN IP address. Again, this is not the IP address of your local host, but the
$VPIPof the virtual extra network card. - Double-check that you have exported the proper
KUBECONFIGbefore calling minikube start. - Note that throughout the sequence covered in the article we set things like the
KUBECONFIGenvironment variable only once, but most of the environment variables are needed throughout the exercise. Don’t change the shell without setting previously set environment variables. - After creating the Ingress, and waiting for five minutes, when
kubectl get certificate -n ${NAMESPACE}showsFalsefor theReadystate… you can do some discovery. There is a good guide here: https://cert-manager.io/docs/faq/troubleshooting/
You can also use the options below. Some may show thatorder is in “invalid" state". That means that something failed, but when looking at the cert-manager logs (see below), it may say that you need to wait an hour… you could use thestart.shscript to restart the process.
kubectl describe certificate -n ${NAMESPACE}kubectl describe order -n ${NAMESPACE}kubectl describe clusterissuer
- Checkout Kubernetes Pod logs to go deeper. You can try these commands for more insight:
kubectl get events -n cert-managerkubectl get events -n my-appkubectl logs -n cert-manager `kubectl get pods -n cert-manager | grep -Ev '(cainjector|webhook)' | grep cert-manager | cut -d\ -f1`
The last commend extracts the generated name of the cert-manager pod and gets the log for that. Look for lines starting with “E”. Note that there are two spaces in the last command between the -d\ and the -f1.
However, please note that in both staging and prod environments: there are time constraints on some activities. For example, cert-manager protects Let’s Encrypt with some timeouts, and you may see text like this in the logs:
Not re-issuing certificate as an attempt has been made in the last hourThat makes things a bit slow. One option is to use the start.sh script instead of manual re-type everything (i.e. start with a fresh cert-manager every time). There is also a test.sh script that calls start.sh for a retry after one hour in case of failure to generate a certificate — assuming you are sure that the configuration itself is correct, this may be a way to overcome timing issues.
